
An introduction to the Fuel PHP framework
Table of contents:
Before You Get Started
This tutorial is here to introduce you to the FuelPHP framework by walking you through the creation of a simple messaging app.
Choose – Windows or Linux/OSX
Requirements
First and foremost, here's what you're going to need on Windows:
- Fuel PHP framework (we're using v1.7.2)
- XAMPP (if you're having trouble installing this, go here for a tutorial)
- PHP Environment Variables Configured in Windows (for command line executions)
- phpMyAdmin (it comes with XAMPP)
- A basic understanding of the Model-View-Controller (MVC) pattern.
- At least a basic understanding of Git and version control systems.
First and foremost, here's what you're going to need on Linux/OSX:
- Fuel PHP framework (we're using v1.7.2)
- Virtual Box
- Docker - can be installed on OSX through homebrew (brew install docker), or visit Docker's installation for Linux documentation.
- Docker Machine - can be installed on OSX through homebrew (brew install docker-machine). You do not need Docker Machine on Linux systems
- Docker Compose - can be installed on OSX through homebrew (brew install docker-compose), or or visit Docker's installation for Linux documentation.
- Database Management program of your choice (ex. Sequel Pro for OSX or DBeaver for linux)
- PHP 5.4.0 or later which should come pre-installed with latest version of OSX (if not pre-installed on linux use execute "install php5" with your package manager)
- A basic understanding of the Model-View-Controller (MVC) pattern.
- At least a basic understanding of Git and version control systems.
Keep in mind that the completed source code for this tutorial is available from the Fuel Crash Course GitHub repository. Simply clone our repo and make sure you initialize all the sub-repos using git submodule update --init
Part 1 – Creating a Messaging System
Basic FuelPhp Setup
Create a folder called “fuel_intro” in the htdocs folder of xampp.
Next, open up command line, navigate to that folder, and type in the following:
git clone https://github.com/fuel/fuel.git .
Don't forget the period at the end, that will clone the files into the directory you are currently in.
Setting Up Development Servers
First, let's set up a docker architecture with an nginx web server, php backend, and mysql database.
-
Clone the fuelphp docker environment to some place in your home directory:
git clone https://github.com/UCF/fuelphp-crash-course-docker.git ~/Documents/ -
Clone fuelphp into a subdirectory of the docker environment called app:
git clone git://github.com/fuel/fuel.git ~/Documents/fuelphp-crash-course-docker/app -
If you don't have a docker virtual machine set up yet, do that now. We'll name ours default:
docker-machine create --driver virtualbox default -
Now make sure docker knows which docker-machine to talk to:
eval "$(docker-machine env default)"
Finishing Up
You can run the servers now with:
docker-compose up
To stop the servers hit control + c.
Installing Dependencies with Composer
Now that the files have been cloned, you have to update all of the PHP dependencies by typing in the following commands:
php composer.phar self-update
php composer.phar update
Config It Up
For this tutorial we're going to be using an orm package, included in your install of Fuel. Head over to fuel/app/config/config.php and uncomment the “always_load” array. Then uncomment the “packages” array and the “orm” package:
				/**************************************************************************/
				/* Always Load                                                            */
				/**************************************************************************/
				'always_load'  => array(

				/**
				* These packages are loaded on Fuel's startup.
				* You can specify them in the following manner:
				*
				* array('auth'); // This will assume the packages are in PKGPATH
				*
				* // Use this format to specify the path to the package explicitly
				* array(
				*     array('auth'	=> PKGPATH.'auth/')
				* );
				*/
				'packages'  => array(
					'orm',
				),

				/**
				* These modules are always loaded on Fuel's startup. You can specify them
				* in the following manner:
				*
				* array('module_name');
				*
				* A path must be set in module_paths for this to work.
				*/
				// 'modules'  => array(),

				/**
				* Classes to autoload & initialize even when not used
				*/
				// 'classes'  => array(),

				/**
				* Configs to autoload
				*
				* Examples: if you want to load 'session' config into a group 'session' you only have to
				* add 'session'. If you want to add it to another group (example: 'auth') you have to
				* add it like 'session' => 'auth'.
				* If you don't want the config in a group use null as groupname.
				*/
				// 'config'  => array(),

				/**
				* Language files to autoload
				*
				* Examples: if you want to load 'validation' lang into a group 'validation' you only have to
				* add 'validation'. If you want to add it to another group (example: 'forms') you have to
				* add it like 'validation' => 'forms'.
				* If you don't want the lang in a group use null as groupname.
				*/
				// 'language'  => array(),
				),
While you're in this file, there's another Fuel preset you'll want to set. That'd be the default timezone. Fuel requires that you set a default timezone for it to work. Fuel uses PHP's built-in time zones, so check out PHP's list of supported timezones and find one that corresponds to yours.
For simplicity's sake, this tutorial will use America/New_York.
				/**
				* DateTime settings
				*
				* server_gmt_offset	in seconds the server offset from gmt timestamp when time() is used
				* default_timezone		optional, if you want to change the server's default timezone
				*/
				'server_gmt_offset'  => 0,
				'default_timezone'   => 'America/New_York',
After doing that, go to your database management software and connect to IP_OF_DOCKER_MACHINE (localhost on Windows) using the 'root' account and password 'secret' (Note: The default MySQL port is 3306, and the username and password are defined in docker-compose.yaml.)
If you are on OSX or Linux, make sure your Docker containers are running with: docker-compose up
Click on Choose Database, and you should see fuel at the bottom. If fuel is there, then you are good to go!!
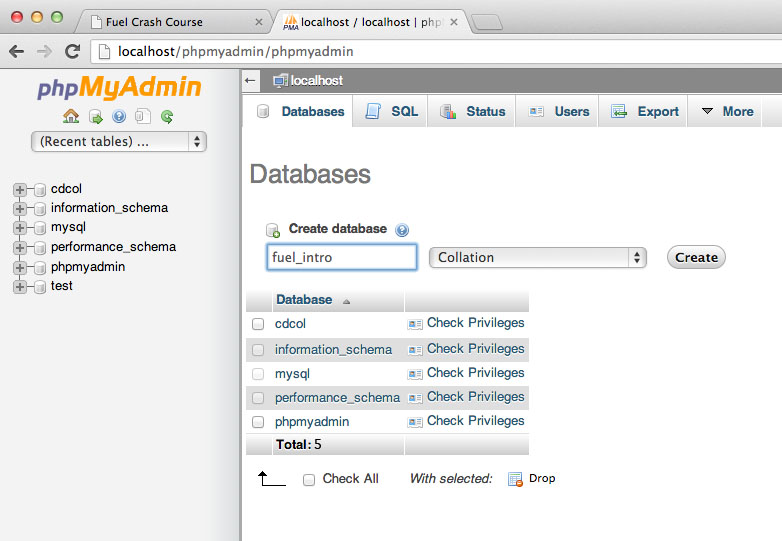
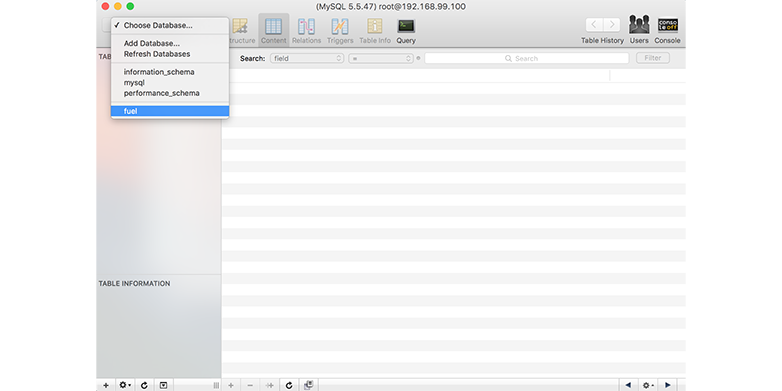
Now, make these changes in the db configuration in Fuel's development environment: fuel/app/config/development/db.php
				return array(
					'default' => array(
						'connection'  => array(
							'dsn'        => 'mysql:host=mysql;dbname=fuel', //for Windows use host=localhost and dbname=fuel_intro
							'username'   => 'root',
							'password'   => 'secret', //password will be blank for Windows users (unless explicity set)
						),
					),
				);
Checking Your Work
In your browser, navigate to http://localhost/fuel_intro/public and you should see the “successful install” page below from Fuel.
In your browser, navigate to http://IP_OF_DOCKER_MACHINE
and you should see the “successful install” page below from Fuel.
Note: IP_OF_DOCKER_MACHINE should be replaced with your docker machines IP without the port. This can be found by running the command docker-machine ls

Troubleshooting
If your page looks like the following screenshot, this means that Fuel does not have write permissions for the listed files, which it needs. If you do not receive any errors, feel free to skip over this next step, as it does not apply to you.

Do the following to give the directories and files the proper permissions.
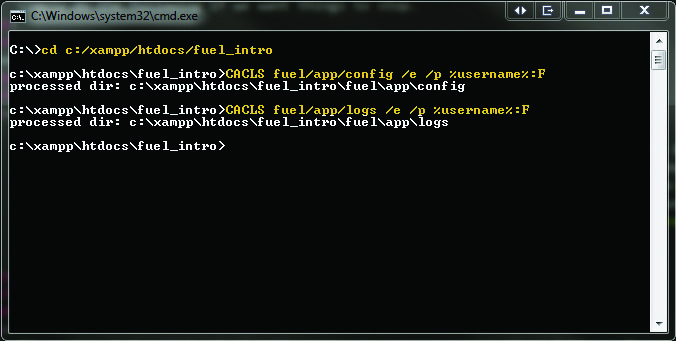
%username% is a special kind of variable in Windows which holds the name of the current logged in user and CACLS is a Windows function which allows you to change permissions on files and folders based on the user.
I would not suggest using these settings in a production environment, but for our purposes they work just fine. To learn more about Windows file permissions, you can read Windows File Permissions.
You could also type the following command into the command line for more help. cacls /?
Oil Slick
Fuel has a cool command line utility called Oil that lets you set up a lot of your controllers and tables automatically.
Bring up Command Prompt, type in the file path of your Fuel installation, and then run php oil. You should see a bit of oil usage documentation.
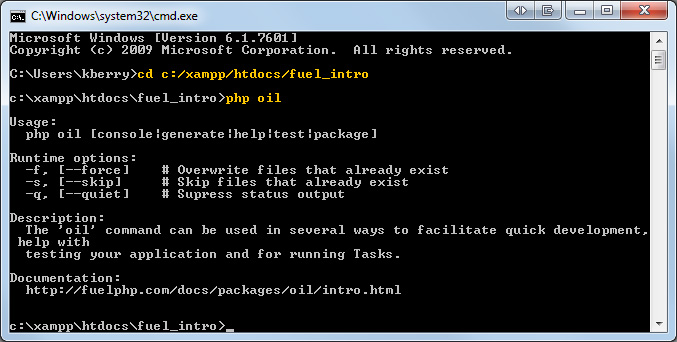
vagrant@precise64:~/Documents/fuel_intro/app$ php oil

								Usage:
								  php oil [cell|console|generate|package|refine|help|server|test]

								Runtime options:
								  -f, [--force]    # Overwrite files that already exist
								  -s, [--skip]     # Skip files that already exist
								  -q, [--quiet]    # Supress status output
								  -t, [--speak]    # Speak errors in a robot voice

								Description:
								  The 'oil' command can be used in several ways to facilitate quick development, help with
								  testing your application and for running Tasks.

								Environment:
								  If you want to specify a specific environment oil has to run in, overload the environment
								  variable on the commandline: FUEL_ENV=staging php oil

								More information:
								  You can pass the parameter "help" to each of the defined command to get inform
Seeing this means that Oil is successfully installed and working! Now let's get to business.
Every Building Needs a Scaffold
Scaffolding in fuel allows you to quickly create a related controller, model (using ORM), and view for manipulating information.
What we want to end up with after creating the scaffold is a table with the following fields:
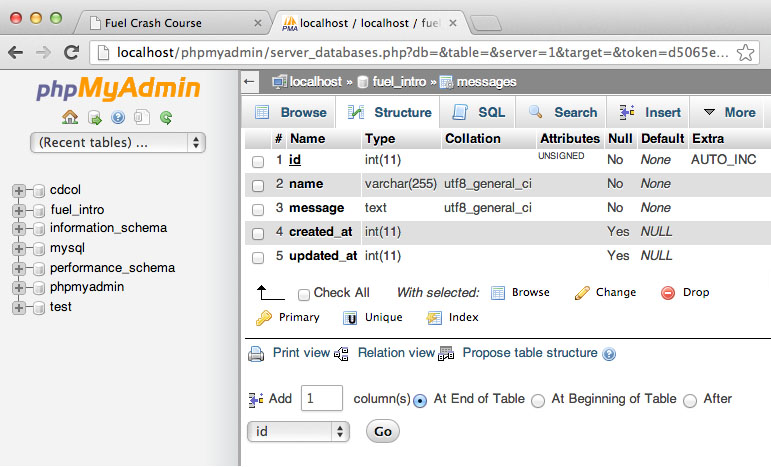
The ‘id', ‘created_at', and ‘updated_at' columns are made automatically, so we only have to tell oil to make the 'name' and 'message' fields. Just feed your command prompt the following:
php oil generate scaffold messages name:string message:text
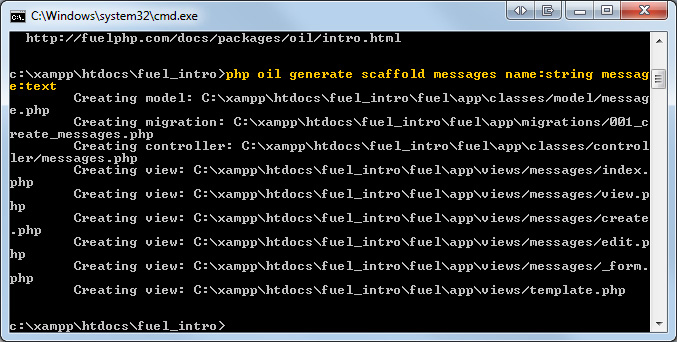
vagrant@precise64:~/Documents/fuel_intro/app$ php oil generate scaffold messages name:string message:text
						Creating migration: /Users/vagrant/Documents/fuel_intro/app/fuel/app/migrations/001_create_messages.php
					  Creating model: /Users/vagrant/Documents/fuel_intro/app/fuel/app/classes/model/message.php
						Creating controller: /Users/vagrant/Documents/fuel_intro/app/fuel/app/classes/controller/messages.php
						Creating view: /Users/vagrant/Documents/fuel_intro/app/fuel/app/views/messages/index.php
						Creating view: /Users/vagrant/Documents/fuel_intro/app/fuel/app/views/messages/view.php
						Creating view: /Users/vagrant/Documents/fuel_intro/app/fuel/app/views/messages/create.php
						Creating view: /Users/vagrant/Documents/fuel_intro/app/fuel/app/views/messages/edit.php
						Creating view: /Users/vagrant/Documents/fuel_intro/app/fuel/app/views/messages/_form.php
						Creating view: /Users/vagrant/Documents/fuel_intro/app/fuel/app/views/template.php
						vagrant@precise64:~/Documents/fuel_intro/app$
The only weird thing about this is that the “string” type for the name is a shortcut that is really varchar[255].
If you look at your document tree, you can see that the controller, model, and view were created and populated with default content.
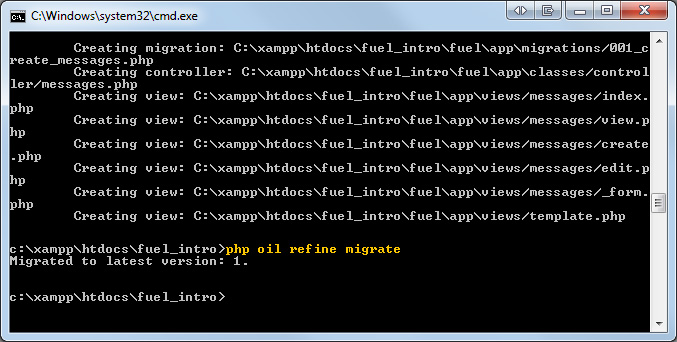
If you look at your database, you'll notice that no table has been created. That's because we need to migrate the database.
Migra-wha?
A migration is like a version control scheme for your database. If you open up the file /fuel/app/migrations/001_create_messages.php you can see what is going to be generated when the migration runs. Checking the file before you run the migration is a good idea, at least to check for typos.
				<?php

				namespace Fuel\Migrations;

				class Create_messages
				{
					public function up()
					{
						\DBUtil::create_table('messages', array(
							'id' => array('constraint' => 11, 'type' => 'int', 'auto_increment' => true),
							'name' => array('constraint' => 255, 'type' => 'varchar'),
							'message' => array('type' => 'text'),
							'created_at' => array('constraint' => 11, 'type' => 'int'),
							'updated_at' => array('constraint' => 11, 'type' => 'int'),

						), array('id'));
					}
					public function down()
					{
						\DBUtil::drop_table('messages');
					}
				}
Since we know what the migration is going to create, go ahead and run it. That'll be:
php oil refine migrate
Quick Note: If you encounter errors migrating with oil, you may need to change this db.php file to read 'mysql:host=127.0.0.1;dbname=fuel_intro'.
Since we know what the migration is going to create, go ahead and run it. That'll be:
docker-compose run phpfpm php oil refine migrate
This command will tell docker to run the phpfpm service. Docker will then run the php oil refine migrate command, and finally the service will be ended automatically.
Note that the containers do not need to be running in order to execute this command.
vagrant@precise64:~/Documents/fuel_intro/app$ docker-compose run phpfpm php oil refine migrate
						Performed migrations for app:default:
						001_create_messages
						vagrant@precise64:~/Documents/fuel_intro/app$
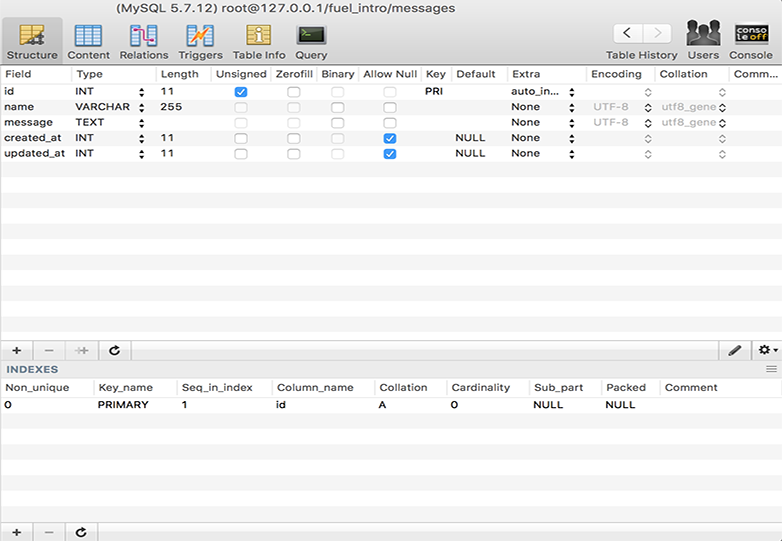
Now the table has been created, and you can add messages to it! Take a look at your database, you should see something like the screenshot from before.
Prettying Up The Code
Navigate to “http://localhost/fuel_intro/public/messages” and add a message.
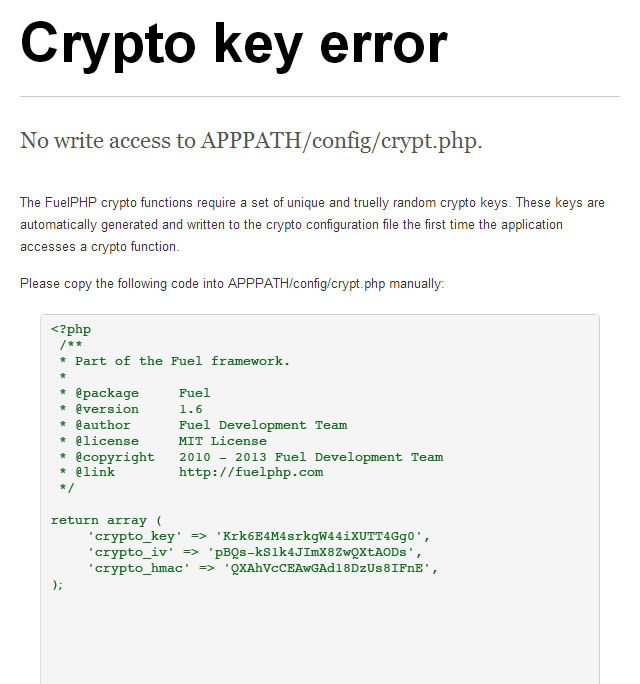
If you see the following error, copy and paste the code into a new php file called crypt.php at /fuel/app/config.
If you look at the message, you'll notice that all the layout is done using a table, so take a minute to make the code semantic.
Go into /fuel/app/views/messages/index.php and change the following table into an unordered list:
After:
				<h2>Listing <span class='muted'>Messages</span></h2>
				<br>
				<?php if ($messages): ?>
					<ul>
						<?php foreach ($messages as $message): ?>
							<li><?php echo $message->name; ?>
								<ul>
									<li><?php echo $message->message; ?></li>
									<li><?php echo Html::anchor('messages/view/'.$message->id, 'View'); ?></li>
									<li><?php echo Html::anchor('messages/edit/'.$message->id, 'Edit'); ?></li>
									<li><?php echo Html::anchor('messages/delete/'.$message->id, 'Delete', array('onclick' => "return confirm('Are you sure?')")); ?></li>
								</ul>
							</li>
						<?php endforeach; ?>
					</ul>

				<?php else: ?>
					<p>No Messages.</p>
				<?php endif; ?>
				<p>
					<?php echo Html::anchor('messages/create', 'Add new Message', array('class' => 'btn btn-success')); ?>
				</p>
Now your code is more semantic, if not more understandable (If you don't like the bullets or the list view, you can take them away using CSS).
New Landing Page
Remember the successful install page you visited immediately after installing fuel? What you were seeing on that page comes from a view as well. Through routing, fuel can redirect the browser to display views outside of the default structure. These routing directions are stored in /fuel/app/config/routes.php.
By default there are two routes: the landing page and the 404 page.
				<?php
				return array(
					'_root_'  => 'welcome/index',  // The default route
					'_404_'   => 'welcome/404',    // The main 404 route

					'hello(/:name)?' => array('welcome/hello', 'name' => 'hello'),
				);
You need to have Fuel redirect the browser to the messages view when going to your web application instead of the successful install page. To do that, simply edit the value for the _root_ key like so:
				<?php
				return array(
					'_root_'  => 'messages/index',  // The default route
					'_404_'   => 'welcome/404',    // The main 404 route

					'hello(/:name)?' => array('welcome/hello', 'name' => 'hello'),
				);
Part 2 – Adding Comments
New Comments
Now that we have semantic messages, we need to add a way for users to add comments to those messages.
We could use a scaffold again to create everything necessary for comments, but let's do everything that the scaffolding command does by hand. This will give you an idea as to just how powerful oil commands are.
The first step is to create our controllers and views for the comments. We will be using oil's generate command again to do this. Let's watch:
php oil generate controller comments edit create
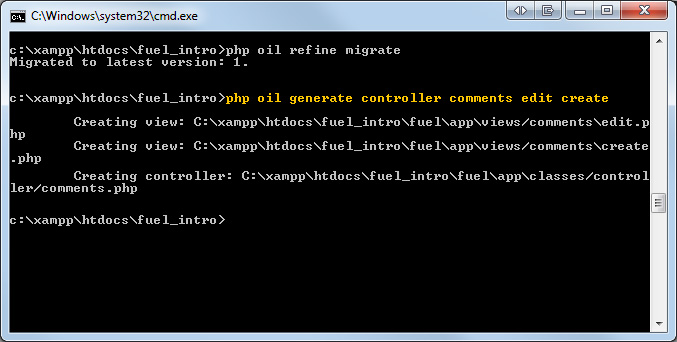
vagrant@precise64:~/Documents/fuel_intro/app$ php oil generate controller comments edit create
						Creating view: /Users/vagrant/Documents/fuel_intro/app/fuel/app/views/comments/edit.php
						Creating view: /Users/vagrant/Documents/fuel_intro/app/fuel/app/views/comments/create.php
						Creating controller: /Users/vagrant/Documents/fuel_intro/app/fuel/app/classes/controller/comments.php
						vagrant@precise64:~/Documents/fuel_intro/app$
As you can see, a controller was generated called “comments” with the actions create and edit. Two views were also created, both associated with the comments controller (edit.php and create.php).
Open the controller at fuel/app/classes/controller/comments.php and see what was made.
Controlling the Power
The comments controller should look like this:
<?php
class Controller_Comments extends Controller_Template
{
public function action_edit()
{
$data["subnav"] = array('edit'=> 'active');
$this->template->title = 'Comments » Edit';
$this->template->content = View::forge('comments/edit', $data);
}
public function action_create()
{
$data["subnav"] = array('create'=> 'active');
$this->template->title = 'Comments » Create';
$this->template->content = View::forge('comments/create', $data);
}
}
Defaults
The default class name for the controller is Controller_NAME, and methods accessible through the url are action_NAME. So if you're making your own methods or controllers, you should follow the conventions that are set forth in this file.
Take careful note that the class ought to read "Controller_Comments", rather than the default "Controller_Comment". Older versions of fuel will autocorrect the name and make it singular.
Now, back in your action_create function, we need to make a few changes to prepare for the views we are about to build:
				public function action_create()
				{
					$data["subnav"] = array('create'=> 'active');
					$this->template->title = 'Comments » Create';
					$data['form'] = View::forge('comments/_form');
					$this->template->content = View::forge('comments/create', $data);
				}
We loaded the form we're about to build into the $data array with the key 'form'. This will be accessible in our view as $form.
Form Templates
If you look at the Messages views (/fuel/app/views/messages/), you will see a file called “_form.php”. This is a form template for messages that gets called in the messages views and should be recreated for the comments views as well.
Go ahead and create a new file called/fuel/app/views/comments/_form.php.
Since this is a form template, you're going to start the file with new form tags. Rather than using straight HTML, Fuel has classes for HTML elements that we will use. To open a new form write the following:
<?php echo Form::open(array("class"=>"form-horizontal")); ?>
Next, create a name field for the comment:
				<?php echo Form::open(array("class"=>"form-horizontal")); ?>
					<fieldset>
						<div class="form-group">
							<?php echo Form::label('Name', 'name', array('class'=>'control-label')); ?>
							<?php echo Form::input('name', ''); ?>
						</div>
Form::label()takes (in order) the text that will be displayed to the user and the id that should match the name attribute of the input field.Form::input()takes (in order) the name attribute of the form and the default value of that form element.
You can repeat this code for the comment text as well. The only difference is that instead of Form::input, you'll need to use Form::textarea(), which takes in the same parameters.
				<?php echo Form::open(array("class"=>"form-horizontal")); ?>
					<fieldset>
						<div class="form-group">
							<?php echo Form::label('Name', 'name', array('class'=>'control-label')); ?>
							<?php echo Form::input('name', ''); ?>
						</div>
						<div class="form-group">
							<?php echo Form::label('Comment', 'comment', array('class'=>'control-label')); ?>
							<?php echo Form::textarea('comment', Input::post('comment', isset($comment) ? $comment->comment : ''), array('cols' => 60, 'rows' => 8)); ?>
						</div>
Did you notice the extra bit of code at the end? The final parameter you can pass for the label, input, or textarea tags is an array of attributes. So when we write “array('cols' => 60, 'rows' => 8));” at the end of the textarea function, it's the same as saying “<textarea cols="60" rows="8"></textarea>“
Next we just need to add the submit button, a hidden input to keep track of the message this comment is attached to, and close the form:
				<?php echo Form::open(array("class"=>"form-horizontal")); ?>
					<fieldset>
						<div class="form-group">
							<?php echo Form::label('Name', 'name', array('class'=>'control-label')); ?>
							<?php echo Form::input('name', ''); ?>
						</div>
						<div class="form-group">
							<?php echo Form::label('Comment', 'comment', array('class'=>'control-label')); ?>
							<?php echo Form::textarea('comment', Input::post('comment', isset($comment) ? $comment->comment : ''), array('cols' => 60, 'rows' => 8)); ?>
						</div>
						<div class="actions">
							<?php echo Form::hidden('message_id', Input::post('message_id', isset($message) ? $message : '')); ?>
							<?php echo Form::submit('submit', 'Submit', array('class' => 'btn btn-primary')); ?>
						</div>
					</fieldset>
				<?php echo Form::close(); ?>
Now open up fuel/app/views/comments/create.php and write the following code:
<?php $message = isset($message) ? $message : ''; ?> <h2 class="first">New Comment</h2> <?php echo $form; ?> <p><?php echo Html::anchor('messages/view/'.$message, 'Back'); ?></p>
This bit of code does the following:
- If the message variable doesn't exist, set it to an empty string.
- Print out the form to the screen.
- Create an anchor tag to take us back to the message.
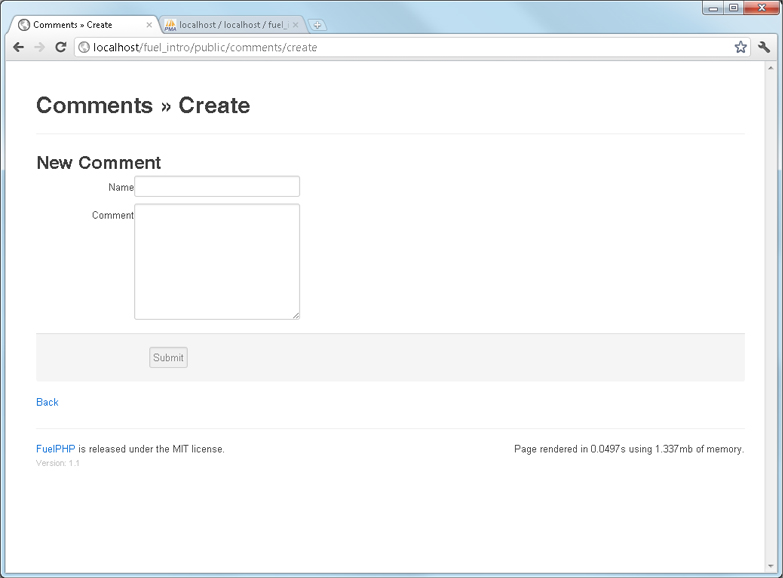
Go to http://localhost/fuel_intro/public/comments/create/ and take a look at the form. You should see this:
Go to http://IP_OF_DOCKER_MACHINE/comments/create/ and take a look at the form. You should see this:
Modeling
This is the easy part of the tutorial. All you need to do is run the following in the command line for oil to use (make sure the model name is singular!):
php oil generate model comment name:string comment:text message_id:int
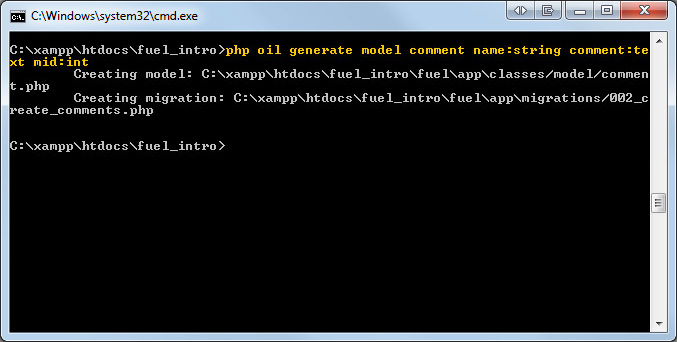
vagrant@precise64:~/Documents/fuel_intro/app$ php oil generate model comment name:string comment:text message_id:int
						Creating model: /Users/vagrant/Documents/fuel_intro/app/fuel/app/classes/model/comment.php
					  Creating migration: /Users/vagrant/Documents/fuel_intro/app/fuel/app/migrations/002_create_comments.php
						vagrant@precise64:~/Documents/fuel_intro/app$
This command created comment.php in the fuel/app/classes/model folder. If you open up the file you should see this:
				<?php

				class Model_Comment extends \Orm\Model
				{
					protected static $_properties = array(
						'id',
						'name',
						'comment',
						'message_id',
						'created_at',
						'updated_at',
					);

					protected static $_observers = array(
						'Orm\Observer_CreatedAt' => array(
							'events' => array('before_insert'),
							'mysql_timestamp' => false,
						),
						'Orm\Observer_UpdatedAt' => array(
							'events' => array('before_update'),
							'mysql_timestamp' => false,
						),
					);

					protected static $_table_name = 'comments';

				}
Why It's So Small
Notice that there's not much code there? That's because the comment model extends a class called ORM, or the Object-relational mapper. You can take a look at some of the more complicated things ORM can do, but for now we're just going to stick to the defaults.
Since we made another model, we're going to have to migrate to the newest version:

vagrant@precise64:~/Documents/fuel_intro/app$ php oil generate scaffold messages name:string message:text
						Creating model: /Users/vagrant/Documents/fuel_intro/app/fuel/app/classes/model/comment.php
					  Creating migration: /Users/vagrant/Documents/fuel_intro/app/fuel/app/migrations/002_create_comments.php
						vagrant@precise64:~/Documents/fuel_intro/app$ docker-compose run phpfpm php oil refine migrate
						Performed migrations for app:default:
						002_create_comments
						vagrant@precise64:~/Documents/fuel_intro/app$
Quick Note: If an error is encountered when migrating, you can fix any typos in your migration file by going to /fuel/app/migrations/###_create_NAME.php and editing the file.
Adding to the Database
We can now edit the comments controller to actually add our comments to the database. So go ahead and open the /fuel/app/classes/controller/comments.php file.
First and foremost, an $id variable is going to be taken in, so we need to add that as an attribute to the action_create function:
				public function action_create($id = null)
				{
					$data["subnav"] = array('edit'=> 'active');
					$this->template->title = 'Comments » Create';
					$data['form'] = View::forge('comments/_form');
					$this->template->content = View::forge('comments/create', $data);
				}
Notice that we are setting the $id to null by default. Now we need to check to make sure that they've completed the form, so we add an if statement:
				public function action_create($id = null)
				{
					if (Input::post())
					{
					}

					$data["subnav"] = array('edit'=> 'active');
					$this->template->title = 'Comments » Create';
					$data['form'] = View::forge('comments/_form');
					$this->template->content = View::forge('comments/create', $data);
				}
This is using Fuel's Input class, but we could have just as easily used "if ($_POST)” as well.
But what about going to the form before submitting?
				public function action_create($id = null)
				{
					if (Input::post())
					{
					}
					else
					{
						$this->template->set_global('message', $id, false);
					}

					$data["subnav"] = array('edit'=> 'active');
					$this->template->title = 'Comments » Create';
					$data['form'] = View::forge('comments/_form');
					$this->template->content = View::forge('comments/create', $data);
				}
This means if they didn't post anything, take the $id and turn it into a variable called $message that the view can use.
Now we need to build a new comment model in order to save the comment into the database.
				public function action_create($id = null)
				{
					if (Input::post())
					{
						$comment = Model_Comment::forge(array(
							'name' => Input::post('name'),
							'comment' => Input::post('comment'),
							'message_id' => Input::post('message_id'),
						));
					}
					else
					{
						$this->template->set_global('message', $id, false);
					}

					$data["subnav"] = array('edit'=> 'active');
					$this->template->title = 'Comments » Create';
					$data['form'] = View::forge('comments/_form');
					$this->template->content = View::forge('comments/create', $data);
				}
$comment is now an object that has the comment information in it, so we need to try and save the comment:
				public function action_create($id = null)
				{
					if (Input::post())
					{
						$comment = Model_Comment::forge(array(
							'name' => Input::post('name'),
							'comment' => Input::post('comment'),
							'message_id' => Input::post('message_id'),
						));

						if ($comment and $comment->save())
						{
						}
					}
					else
					{
						$this->template->set_global('message', $id, false);
					}

					$data["subnav"] = array('edit'=> 'active');
					$this->template->title = 'Comments » Create';
					$data['form'] = View::forge('comments/_form');
					$this->template->content = View::forge('comments/create', $data);
				}
‘And' is used here instead of ‘&&' because it's part of the Fuel coding standards.
If the if statement is successful, it will save the comment to the database, so we should now set a flash to show that to the user. Session Flashes are for information with a limited lifespan, such as presenting success or failure information.
So we can set our flash and redirect our user back to the message they were viewing:
				public function action_create($id = null)
				{
					if (Input::post())
					{
						$comment = Model_Comment::forge(array(
							'name' => Input::post('name'),
							'comment' => Input::post('comment'),
							'message_id' => Input::post('message_id'),
						));

						if ($comment and $comment->save())
						{
							Session::set_flash('success', 'Added comment #'.$comment->id.'.');
							Response::redirect('messages/view/'.$comment->message_id);
						}
					}
					else
					{
						$this->template->set_global('message', $id, false);
					}

					$data["subnav"] = array('edit'=> 'active');
					$this->template->title = 'Comments » Create';
					$data['form'] = View::forge('comments/_form');
					$this->template->content = View::forge('comments/create', $data);
				}
or else we set the flash to say that the comment couldn't be saved:
				public function action_create($id = null)
				{
					if (Input::post())
					{
						$comment = Model_Comment::forge(array(
							'name' => Input::post('name'),
							'comment' => Input::post('comment'),
							'message_id' => Input::post('message_id'),
						));

						if ($comment and $comment->save())
						{
							Session::set_flash('success', 'Added comment #'.$comment->id.'.');
							Response::redirect('messages/view/'.$comment->message_id);
						}
						else
						{
							Session::set_flash('error', 'Could not save comment.');
						}
					}
					else
					{
						$this->template->set_global('message', $id, false);
					}

					$data["subnav"] = array('edit'=> 'active');
					$this->template->title = 'Comments » Create';
					$data['form'] = View::forge('comments/_form');
					$this->template->content = View::forge('comments/create', $data);
				}
Creating a Comment from a Message
Now we're going to add a link to the view.php file in the messages view, so you can add a comment to any message.
Go to /fuel/app/views/messages/view.php and add:
				<p>
					<strong>Name:</strong>
					<?php echo $message->name; ?>
				</p>
				<p>
					<strong>Message:</strong>
					<?php echo $message->message; ?>
				</p>
				<p><?php echo Html::anchor('comments/create/'.$message->id, 'Add new Comment'); ?></p>
				<?php echo Html::anchor('messages/edit/'.$message->id, 'Edit'); ?> |
				<?php echo Html::anchor('messages', 'Back'); ?>
Go to http://localhost/fuel_intro/public/messages/ and tadd a comment to one of your messages so we can keep going.
Go to http://IP_OF_DOCKER_MACHINE/messages/ and add a comment to one of your messages so we can keep going.
Now that we have a Comment…
Since there is a comment in the database now, we can add functions to the controller to manipulate that comment. First off, we need a way to be able to edit that comment in /fuel/app/classes/controller/comments.php.
The edit function will take in one parameter which is the id of the comment
				public function action_edit($id = null)
				{
					$data["subnav"] = array('edit'=> 'active');
					$this->template->title = 'Comments » Edit';
					$this->template->content = View::forge('comments/edit', $data);
				}
Now we use the comment model to find the comment, based on its id.
				public function action_edit($id = null)
				{
					$comment = Model_Comment::find($id);
					$data["subnav"] = array('edit'=> 'active');
					$this->template->title = 'Comments » Edit';
					$this->template->content = View::forge('comments/edit', $data);
				}
The rest of the code is pretty much the same as creating a comment with a few minor tweaks, here it is in bulk:
				public function action_edit($id = null)
				{
					$comment = Model_Comment::find($id);
					if (Input::post())
					{
						$comment->name = Input::post('name');
						$comment->comment = Input::post('comment');
						if ($comment->save())
						{
							Session::set_flash('success', 'Updated comment #'.$id);
							Response::redirect('messages/view/'.$comment->message_id);
						}
						else
						{
							Session::set_flash('error', 'Could not update comment #'.$id);
						}
					}
					else
					{
						$this->template->set_global('comment', $comment, false);
						$this->template->set_global('message', $comment->message_id, false);
					}
					$data["subnav"] = array('edit'=> 'active');
					$this->template->title = 'Comments » Edit';
					$data['form'] = View::forge('comments/_form');
					$this->template->content = View::forge('comments/edit', $data);
				}
The action $comment->save() updates the comment if it already exists in the database, or adds it if it doesn't.
Note the global variable $message, which will keep track of the message id.
Also note the $form variable, which will contain our form.
All that remains is to fix up the comment edit view. Go ahead and open up fuel/app/views/comments/edit.php. It'll wind up looking like the view for editing messages, with a few differences:
					<ul class="nav nav-pills">
						<li class='<?php echo Arr::get($subnav, "edit" ); ?>'><?php echo Html::anchor('comments/edit','Edit');?></li>
						<li class='<?php echo Arr::get($subnav, "create" ); ?>'><?php echo Html::anchor('comments/create','Create');?></li>
					</ul>
					<h2>Editing Comment</h2>
					<br/>
					<?php $message = isset($message) ? $message : ''; ?>
					<?php echo $form; ?>
					<p><?php echo Html::anchor('messages/view/'.$comment->message_id, 'Back'); ?></p>
Deletion
Deleting the comment is just as easy as saving it. Go back to /fuel/app/classes/controller/comments.php and create another action function called delete, and then call $comment->delete() instead of $comment->save(). Don't forget to pass the comment id!
					public function action_delete($id)
					{
						$comment = Model_Comment::find($id);
						if ($comment)
						{
							$comment->delete();
							Session::set_flash('success', 'Deleted comment #'.$id);
						}
						else
						{
							Session::set_flash('error', 'Could not delete comment #'.$id);
						}
						Response::redirect('messages/view/'.$comment->message_id);
					}
In the next section we aim to accomplish two things: showing the number of comments that a message has and showing the comments in a list when we view the message.
Number of Comments
Open up the messages controller. At this point you should be pretty good at navigating the file tree, so we'll stop giving you paths to things you've seen) and take a look at action_index:
				public function action_index()
				{
					$data[$messages] = Model_Message::find('all');
					$this->template->title = "Messages";
					$this->template->content = View::forge('messages/index', $data);
				}
Pretty simple, it's finding all the messages and sending them to the view. In this statement. To make things a little more flexible as we add in comments, we're going to put the view and messages into their own variables.
Go to the top of the function and add this:
				public function action_index()
				{
					$messages = Model_Message::find('all');
					$view = View::forge('messages/index', array('messages' => $messages));
					$this->template->title = "Messages";
					$this->template->content = $view;
				}
Just under the messages array we're going to declare an array called $comment_links, and then loop through the messages:
				public function action_index()
				{
					$messages = Model_Message::find('all');

					$comment_links = array();
					foreach ($messages as $message)
					{
					}

					$view = View::forge('messages/index', array('messages' => $messages));
					$this->template->title = "Messages";
					$this->template->content = $view;
				}
We need to retrieve the comments associated with this particular message, so we query the database for comments that match the message's id. So far we have been using models to retrieve information from the database, and we could do that here using the Model's query method, but Fuel also has a DB class that we'd like to show you.
				public function action_index()
				{
					$messages = Model_Message::find('all');

					$comment_links = array();
					foreach ($messages as $message)
					{
						$query = DB::select()
							->from('comments')
							->where('message_id', $message->id)
							->execute();
					}

					$view = View::forge('messages/index', array('messages' => $messages));
					$this->template->title = 'Messages';
					$this-template->content = $view;
				}
The DB::select() method builds a SQL query to retrieve all the comments. This is analogous to “SELECT * FROM 'comments' WHERE message_id = $message->id“
Now we just need to count the number of results and add that number to the $comment_links array. To make the message's comments easy to access, we're going to make the comment array key match the message id:
				public function action_index()
				{
					$messages = Model_Message::find('all');

					$comment_links = array();
					foreach ($messages as $message)
					{
						$results = DB::select()
							->from('comments')
							->where('message_id', $message->id)
							->execute();

						$count = count($results);
						$comment_links[$message->id] = "View | $count Comment(s)";
					}

					$view = View::forge('messages/index', array('messages' => $messages));
					$this->template->title = 'Messages';
					$this->template->content = $view;
				}
Let's pretty up the comment count. We'll use Fuel's Inflector class to automatically pluralize ‘Comment‘ if the count is 0 or above 1.
				public function action_index()
				{
					$messages = Model_Message::find('all');

					$comment_links = array();
					foreach ($messages as $message)
					{
						$results = DB::select()
							->from('comments')
							->where('message_id', $message->id)
							->execute();

						$count = count($results);

						if ($count == 0)
						{
							$comment_links[$message->id] = 'View';
						}
						else
						{
							$comment_links[$message->id] = $count.' '.Inflector::pluralize('Comment', $count);
						}
					}

					$view = View::forge('messages/index', array('messages' => $messages));
					$this->template->title = 'Messages';
					$this->template->content = $view;
				}
Now we just need to set the $comment_links and $messages variables to the view (which is why we declared $view at the top of the function):
				public function action_index()
				{
					$messages = Model_Message::find('all');

					$comment_links = array();
					foreach ($messages as $message)
					{
						$results = DB::select()
							->from('comments')
							->where('message_id', $message->id)
							->execute();

						$count = count($results);

						if ($count == 0)
						{
							$comment_links[$message->id] = 'View';
						}
						else
						{
							$comment_links[$message->id] = $count.' '.Inflector::pluralize('Comment', $count);
						}
					}

					$view = View::forge('messages/index');
					$view->set('comment_links', $comment_links);
					$view->set('messages', $messages);
					$this->template->title = 'Messages';
					$this->template->content = $view;
				}
Now that we are passing the number of comments to the messages view, we need to modify the html to display it. Go back to the index.php file for the messages view, and change it from this:
<li><?php echo Html::anchor('messages/view/'.$message->id, 'View'); ?></li>
To this:
<li><?php echo Html::anchor('messages/view/'.$message->id, $comment_links[$message->id]); ?></li>
What we did was modify the “View” message link to include the number of comments, if any are present. At the moment, there shouldn't be any.
Go to http://localhost/fuel_intro/public/messages/ and you should see the number of comments each message has
Go to http://IP_OF_DOCKER_MACHINE/messages/ and you should see the number of comments each message has
Showing the Comments
To actually show the comments for each view, you need to get all the comments associated with a message in the messages controller:
				public function action_view($id = null)
				{
					is_null($id) and Response::redirect('messages');

					if ( ! $message = Model_Message::find($id))
					{
						Session::set_flash('error', 'Could not find message #'.$id);
						Response::redirect('messages');
					}

					$comments = Model_Comment::find('all', array('where' => array('message_id' => $id)));

					$data = array(
						'message' => $message,
						'comments' => $comments
					);

					$this->template->title = 'Message';
					$this->template->content = View::forge('messages/view', $data);
				}
The second parameter of the find() method defines the options in the query. Here we use it to define the WHERE statement in our query.
Now all we need to do is show it on the view.php page of the message views:
				<p>
					<strong>Message:</strong>
					<?php echo $message->message; ?>
				</p>
				<h3>Comments</h3>
				<ul>
				<?php foreach ($comments as $comment) : ?>
					<li>
						<ul>
							<li><strong>Name:</strong> <?php echo $comment->name; ?></li>
							<li><strong>Comment:</strong><br /><?php echo $comment->comment; ?></li>
							<li><p><?php echo Html::anchor('comments/edit/'.$comment->id, 'Edit'); ?>|
							<?php echo Html::anchor('comments/delete/'.$comment->id, 'Delete', array('onclick' => "return confirm('Are you sure?')")); ?></li>
						</ul>
					</li>
				<?php endforeach; ?>
				</ul>
The final section will deal with logging and and creating users.
Part 3 – Adding a Login System
Creating Users and Login
At this point we've made our messages and comments system. However, we don't want just anyone to be able to edit/delete messages, and it would be nice if messages were associated with some kind of username, so we're going to make a simple and generic user system for our messages.
First add the ‘auth' package to the package list in the config file. That's fuel/app/config/config.php, in case you forgot.
				'packages'	=> array(
					'orm',
					'auth',
				),
Then we need to create a controller for our login:
php oil g controller users login logout register

vagrant@precise64:~/Documents/fuel_intro/app$ php oil g controller users login logout register
						Creating view: /Users/vagrant/Documents/fuel_intro/app/fuel/app/views/users/login.php
					  Creating view: /Users/vagrant/Documents/fuel_intro/app/fuel/app/views/users/logout.php
						Creating view: /Users/vagrant/Documents/fuel_intro/app/fuel/app/views/users/register.php
						Creating controller: /Users/vagrant/Documents/fuel_intro/app/fuel/app/classes/controller/users.php
						vagrant@precise64:~/Documents/fuel_intro/app$
Notice that we used g instead of generate. This is just one example of the many short tags that Oil allows you to use.
Now we need to build the models:
php oil g model user username:string password:string group:int email:string last_login:string login_hash:string profile_fields:string
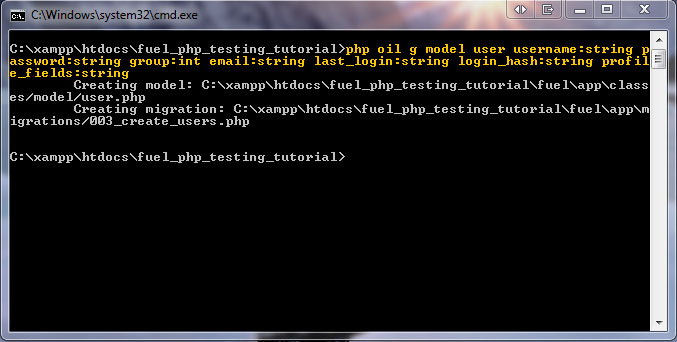
vagrant@precise64:~/Documents/fuel_intro/app$ php oil g model user username:string password:string group:int email:string last_login:string login_hash:string profile_fields:string
						Creating model: /Users/vagrant/Documents/fuel_intro/app/fuel/app/classes/model/user.php
					  Creating migration: /Users/vagrant/Documents/fuel_intro/app/fuel/app/migrations/003_create_users.php
						vagrant@precise64:~/Documents/fuel_intro/app$
The only thing that should be explained on this line is groups. Here's the default group number definitions:
- -1 =
- Banned
- 0 =
- Guests
- 1 =
- Users
- 50 =
- Moderators
- 100 =
- Administrators
This allows you to check all of your user access in bulk, e.g. restricting access for all users whose group is lower than a specific number.
Finally, migrate to the new version (using the short tag “r” instead of “refine”):
php oil r migrate
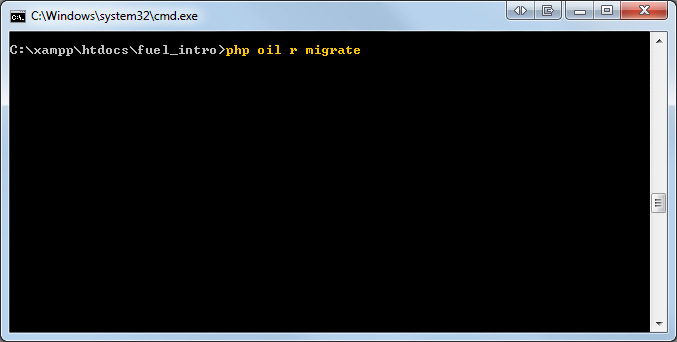
vagrant@precise64:~/Documents/fuel_intro/app$ docker-compose run phpfpm php oil r migrate
						Performed migrations for app:default:
					  003_create_users
						vagrant@precise64:~/Documents/fuel_intro/app$
The Default Table
The auth package defaults to a user table called “users” by default, so we don't need to do change any configuration options here. But it's good to know where to find the default table name, and how to change it. The auth package has it's own configurations located within the package directory, the following file defines what the user table is called.
/fuel/packages/auth/config/simpleauth.php:
					/**
					* DB table name for the user table
					*/
					'table_name' => 'users',
You can change the setting directly in this file, however the best method to change the user table would be to duplicate the above config and place it in a fuel/app/config/simpleauth.php file. Fuel will automatically override the default package configuration files with your app's configurations.
Registration
Now that we have a model, controller, and views, we need to add a link to the registration so people can actually sign up! Since this should be on the top of all the pages, we need to edit the template page for the entire site. So go to /fuel/app/views/template.php and add the following:
					<body>
						<div class="container">
							<div class="col-md-12">
								<h1><?php echo $title; ?></h1>
								<hr>
								<?php
									if (isset($user_info))
									{
										echo $user_info;
									}
									else
									{
										$link = array(Html::anchor('users/login', 'Login'), Html::anchor('users/register', 'Register'));
										echo Html::ul($link);
									}
								?>
					<?php if (Session::get_flash('success')): ?>
This checks to see if a user is logged in (we'll call the object with the user's info in it $user_info), if they're not logged in, then it builds an unordered list that links to a registration page.
Registration Model
We're going to create the registration form using the model and passing it with the controller. Create a function at the bottom of the user model. It's going to have an empty form called a Fieldset passed into it, which is kind of like a form that has validation attached to it:
				<?php
				use OrmModel;

				class Model_Message extends Model
				{
					protected static $_properties = array(
						'id',
						'name',
						'message',
						'created_at',
						'updated_at',
					);

					protected static $_observers = array(
						'OrmObserver_CreatedAt' => array(
							'events' => array('before_insert'),
							'mysql_timestamp' => false,
						),
						'OrmObserver_UpdatedAt' => array(
							'events' => array('before_save'),
							'mysql_timestamp' => false,
						),
					);

					public static function validate($factory)
					{
						$val = Validation::forge($factory);
						$val->add_field('name', 'Name', 'required|max_length[255]');
						$val->add_field('message', 'Message', 'required');

						return $val;
					}

					public static function populate_register_fieldset(Fieldset $form)
					{
					}

				}
Now we need to attach fields to this form, and send it back to the controller.
				public static function populate_register_fieldset(Fieldset $form)
				{
					$form->add('username', 'Username:')->add_rule('required');
					$form->add('password', 'Choose Password:', array('type'=>'password'))->add_rule('required');
					$form->add('password2', 'Re-type Password:', array('type' => 'password'))->add_rule('required');
					$form->add('email', 'E-mail:')->add_rule('required')->add_rule('valid_email');
					$form->add('submit', ' ', array('type'=>'submit', 'value' => 'Register'));
					return $form;
				}
The add() function adds a certain field with the field's name, label, and attributes in that order. The add_rule() function adds a validation rule to the field. All the rules available by default can be found here.
User Controller Registration Function
Now we're going to go to the action_register function within the users controller.
We are going to change it from this:
				public function action_register()
				{
					$data["subnav"] = array('register'=> 'active' );
					$this->template->title = 'Users » Register';
					$this->template->content = View::forge('users/register', $data);
				}
To this:
				public function get_register($fieldset = null, $errors = null)
				{
					$data["subnav"] = array('register'=> 'active' );
					$auth = Auth::instance();
					$view = View::forge('users/register', $data);

					if (empty($fieldset))
					{
						$fieldset = Fieldset::forge('register');
						Model_User::populate_register_fieldset($fieldset);
					}

					$view->set('reg', $fieldset->build(), false);
					if ($errors) $view->set_safe('errors', $errors);
					$this->template->title = 'Users » Register';
					$this->template->content = $view;
				}

				public function post_register()
				{
					$fieldset = Model_User::populate_register_fieldset(Fieldset::forge('register'));
				}
The reason for this fragmentation is that both methods will be more specified in what they do.
We will use $auth to authenticate users, $view will be the view that will be displayed to the user, and $fieldset will be the fieldset that we're sending to the model. Model_User::populate_register_fieldset($form) just populates the form with the fields.
If we build the form in the view, we can see how this will work. Go to the user register view and add:
				<ul class="nav nav-pills">
					<li class='<?php echo Arr::get($subnav, "login" ); ?>'><?php echo Html::anchor('users/login','Login');?></li>
					<li class='<?php echo Arr::get($subnav, "logout" ); ?>'><?php echo Html::anchor('users/logout','Logout');?></li>
					<li class='<?php echo Arr::get($subnav, "register" ); ?>'><?php echo Html::anchor('users/register','Register');?></li>
				</ul>
				<p>Register</p>
				<?php if (isset($errors)) { echo $errors; } ?>
				<?php echo $reg; ?>
Once you do this, you should see the registration form if you go to http://localhost/fuel_intro/public/index.php/users/register.
Validating the Registration
Now what happens when someone actually fills out the form? We need to have their registration validated. So we need to repopulate the form field with the values that the user typed in, and then send the whole form and authentication to a validation controller. Insert this into post_register() within your users controller:
				public function post_register()
				{
					$fieldset = Model_User::populate_register_fieldset(Fieldset::forge('register'));
					$fieldset->repopulate();
					$result = Model_User::validate_registration($fieldset, Auth::instance());
				}
Your user model now needs to take in the form and authentication, so add these functions to it:
			public static function register(Fieldset $form)
			{
				$form->add('username', 'Username:')->add_rule('required');
				$form->add('password', 'Choose Password', array('type'=> 'password'))->add_rule('required');
				$form->add('password2', 'Re-type Password:', array('type' => 'password'))->add_rule('required');
				$form->add('email', 'E-mail:')->add_rule('required')->add_rule('valid_email');
				$form->add('submit', ' ', array('type' => 'submit', 'value' => 'Register'));
				return $form;
			}

			public static function validate_registration(Fieldset $form, $auth)
			{
			}
Then we need to add a rule to the password field that will ensure that the user has typed in a matching password in the password2 field:
				public static function validate_registration(Fieldset $form, $auth)
				{
					$form->field('password')->add_rule('match_value', $form->field('password2')->get_attribute('value'));
				}
Now we need to create a validation object and set messages to display what we want if the user enters in something incorrectly:
				public static function validate_registration(Fieldset $form, $auth)
				{
					$form->field('password')->add_rule('match_value', $form->field('password2')->get_attribute('value'));
					$val = $form->validation();
					$val->set_message('required', 'The field :field is required');
					$val->set_message('valid_email', 'The field :field must be an email address');
					$val->set_message('match_value', 'The passwords must match');
				}
For a full explanation of the set message feature, look at Fuel's documentation on error messages.
Next, we try to run the validation to see if it passes or fails:
				public static function validate_registration(Fieldset $form, $auth)
				{
					$form->field('password')->add_rule('match_value', $form->field('password2')->get_attribute('value'));
					$val = $form->validation();
					$val->set_message('required', 'The field :field is required.');
					$val->set_message('valid_email', 'The field :field must be an e-mail address.');
					$val->set_message('match_value', 'The passwords must match.');

					if ($val->run())
					{
					}
					else
					{
						$errors = $val->show_errors();
						return array('e_found' => true, 'errors' => $errors);
					}
				}
So, if the validation doesn't pass, the show_errors() function turns the errors into an HTML list, and we return that and a boolean saying that errors were found.
What if they Pass?
If the user passes validation, then we get their username, password, and email from the form:
				public static function validate_registration(Fieldset $form, $auth)
				{
					$form->field('password')->add_rule('match_value', $form->field('password2')->get_attribute('value'));
					$val = $form->validation();
					$val->set_message('required', 'The field :field is required.');
					$val->set_message('valid_email', 'The field :field must be an e-mail address.');
					$val->set_message('match_value', 'The passwords must match.');

					if ($val->run())
					{
						$username = $form->field('username')->get_attribute('value');
						$password = $form->field('password')->get_attribute('value');
						$email = $form->field('email')->get_attribute('value');
					}
					else
					{
						$errors = $val->show_errors();
						return array('e_found' => true, 'errors' => $errors);
					}
				}
Try to create the user in the database, and catch any errors if we find them:
				public static function validate_registration(Fieldset $form, $auth)
				{
					$form->field('password')->add_rule('match_value', $form->field('password2')->get_attribute('value'));
					$val = $form->validation();
					$val->set_message('required', 'The field :field is required.');
					$val->set_message('valid_email', 'The field :field must be an e-mail address.');
					$val->set_message('match_value', 'The passwords must match.');

					if ($val->run())
					{
						$username = $form->field('username')->get_attribute('value');
						$password = $form->field('password')->get_attribute('value');
						$email = $form->field('email')->get_attribute('value');
						try
						{
							$user = $auth->create_user($username, $password, $email);
						}
						catch (Exception $e)
						{
							$error = $e->getMessage();
						}
					}
					else
					{
						$errors = $val->show_errors();
						return array('e_found' => true, 'errors' => $errors);
					}
				}
We're going to be nice here and log the user in once they register. So if the $user object is present, we can use the $auth object we passed to log the person in:
				public static function validate_registration(Fieldset $form, $auth)
				{
					$form->field('password')->add_rule('match_value', $form->field('password2')->get_attribute('value'));
					$val = $form->validation();
					$val->set_message('required', 'The field :field is required.');
					$val->set_message('valid_email', 'The field :field must be an e-mail address.');
					$val->set_message('match_value', 'The passwords must match.');

					if ($val->run())
					{
						$username = $form->field('username')->get_attribute('value');
						$password = $form->field('password')->get_attribute('value');
						$email = $form->field('email')->get_attribute('value');
						try
						{
							$user = $auth->create_user($username, $password, $email);
						}
						catch (Exception $e)
						{
							$error = $e->getMessage();
						}

						if (isset($user))
						{
							$auth->login($username, $password);
						}
					}
					else
					{
						$errors = $val->show_errors();
						return array('e_found' => true, 'errors' => $errors);
					}
				}
If the login doesn't work, then we create an unordered list and return both that and the errors found array:
				public static function validate_registration(Fieldset $form, $auth)
				{
					$form->field('password')->add_rule('match_value', $form->field('password2')->get_attribute('value'));
					$val = $form->validation();
					$val->set_message('required', 'The field :field is required');
					$val->set_message('valid_email', 'The field :field must be an email address');
					$val->set_message('match_value', 'The passwords must match');

					if ($val->run())
					{
						$username = $form->field('username')->get_attribute('value');
						$password = $form->field('password')->get_attribute('value');
						$email = $form->field('email')->get_attribute('value');
						try
						{
							$user = $auth->create_user($username, $password, $email);
						}
						catch (Exception $e)
						{
							$error = $e->getMessage();
						}

						if (isset($user))
						{
							$auth->login($username, $password);
						}
						else
						{
							if (isset($error))
							{
								$li = $error;
							}
							else
							{
								$li = 'Something went wrong with creating the user!';
							}
							$errors = Html::ul(array($li));
							return array('e_found' => true, 'errors' => $errors);
						}
					}
					else
					{
						$errors = $val->show_errors();
						return array('e_found' => true, 'errors' => $errors);
					}
				}
We have two more things to do. First, go to post_register() on the users controller and add a check for errors, if there are no errors found, log the user in and redirect to the homepage:
				public function post_register()
				{
					$fieldset = Model_User::populate_register_fieldset(Fieldset::forge('register'));
					$fieldset->repopulate();
					$result = Model_User::validate_registration($fieldset, Auth::instance());
					if ($result['e_found'])
					{
						return $this->get_register($fieldset, $result['errors']);
					}

					Session::set_flash('success', 'User created.');
					Response::redirect('./');
				}
Second, go to the register view and check for errors:
				<?php if (isset($errors)){echo $errors;}?>
				<?php echo $reg; ?>
There, now you should be able to register and be logged in automatically.
Regular Logging In and Out
At this point in the crash course we should be able to give you the code for this and expect you to understand it.
Add the following within the users controller:
				public function action_login()
				{
					$data["subnav"] = array('login'=> 'active' );
					$auth = Auth::instance();
					$view = View::forge('users/login', $data);
					$form = Form::forge('login');
					$form->add('username', 'Username:');
					$form->add('password', 'Password:', array('type' => 'password'));
					$form->add('submit', ' ', array('type' => 'submit', 'value' => 'Login'));
					if (Input::post())
					{
						if ($auth->login(Input::post('username'), Input::post('password')))
						{
							Session::set_flash('success', 'Successfully logged in! Welcome '.$auth->get_screen_name());
							Response::redirect('messages/');
						}
						else
						{
							Session::set_flash('error', 'Username or password incorrect.');
						}
					}
					$view->set('form', $form, false);
					$this->template->title = 'User » Login';
					$this->template->content = $view;
				}

				public function action_logout()
				{
					$auth = Auth::instance();
					$auth->logout();
					Session::set_flash('success', 'Logged out.');
					Response::redirect('messages/');
				}
Don't forget to echo the form in the login view! The code is very similar to the user registration view with the exception of swapping $reg with $form.
Finishing Touches
Let's quickly tidy up some of our code. We just need to add the name of the person making the message (instead of letting them type it in themselves), and give them editing rights to their own posts.
Go to the _form.php files in both the comments and the messages views and replace the name input field with the user's name.
In messages, from this:
				<div class="form-group">
						<?php echo Form::label('Name', 'name', array('class'=>'control-label')); ?>

							<?php echo Form::input('name', Input::post('name', isset($message) ? $message->name : ''), array('class' => 'col-md-4 form-control', 'placeholder'=>'Name')); ?>

				</div>
To this:
				<div class="form-group">
					<?php echo Form::label('Name', 'name', array('class'=>'control-label')); ?>
					<?php echo Auth::instance()->get_screen_name(); ?>
				</div>
In comments, from this:
				<?php echo Form::label('Name', 'name', array('class'=>'control-label')); ?>
				<?php echo Form::input('name', Input::post('name', isset($comment) ? $comment->name : '')); ?>
To this:
				<?php echo Form::label('Name', 'name', array('class'=>'control-label')); ?>
				<?php echo Auth::instance()->get_screen_name(); ?>
Next, in both the message and comment controllers, replace the posted name with the user name in the action_create() function. Change it from this:
'name' => Input::post('name'),
To this:
'name' => Auth::instance()->get_screen_name(),
Since we don't have a name input form any more, and the message model is still expecting one, you'll have to remove that old requirement. Head over to the message model and remove the validation check for the name field:
$val->add_field('name', 'Name', 'required|max_length[255]');
Now, head over to the messages index view. Add a check to see if any of the messages being browsed were created by the current user, and if so enable edit/delete privileges on them. This is actually pretty easy. Just change this:
				<li><?php echo Html::anchor('messages/edit/'.$message->id, 'Edit'); ?></li>
				<li><?php echo Html::anchor('messages/delete/'.$message->id, 'Delete', array('onclick' => "return confirm('Are you sure?')")); ?></li>
To this:
				<?php if ($message->name == Auth::instance()->get_screen_name()) : ?>
					<li><?php echo Html::anchor('messages/edit/'.$message->id, 'Edit'); ?></li>
					<li><?php echo Html::anchor('messages/delete/'.$message->id, 'Delete', array('onclick' => "return confirm('Are you sure?')")); ?></li>
				<?php endif; ?>
Since there's also an Edit link inside each message, we need to put a check in the message view as well. This code:
				<?php echo Html::anchor('messages/edit/'.$message->id, 'Edit'); ?> |
				<?php echo Html::anchor('messages/', 'Back'); ?>
Becomes:
				<?php
				if ($message->name == Auth::instance()->get_screen_name())
				{
					echo Html::anchor('messages/edit/'.$message->id, 'Edit');
					echo ' | ';
				}
				echo Html::anchor('messages', 'Back');
				?>
We should do the same check for comments. In the message view, find:
				<li><p><?php echo Html::anchor('comments/edit/'.$comment->id.'/'. $message->id, 'Edit'); ?>|
				<?php echo Html::anchor('comments/delete/'.$comment->id.'/'.$message->id, 'Delete', array('onclick' => "return confirm('Are you sure?')")); ?></li>
And change it to:
				<?php if ($comment->name == Auth::instance()->get_screen_name()) : ?>
					<li><p><?php echo Html::anchor('comments/edit/'.$comment->id.'/'.$message->id, 'Edit'); ?>|
					<?php echo Html::anchor('comments/delete/'.$comment->id.'/'.$message->id, 'Delete', array('onclick'=> "return confirm('Are you sure?')")); ?></li>
				<?php endif; ?>
Now you should be able to register users, log in separately, and only have the ability to edit or delete your own messages and comments!
This Is the Last Thing, I Promise
The very last thing we're going to do is to check if the user is logged in. If they are, allow them to make a message or comment.
Add this code towards the top of the message view:
				<?php if (Auth::instance()->check()) : ?>
					<p><?php echo Html::anchor('comments/create/'.$message->id, 'Add new Comment'); ?></p>
				<?php endif; ?>
				<h3>Comments</h3>
				<ul>
Likewise at the bottom of the message's index view:
				<?php
				if (Auth::instance()->check())
				{
					echo Html::anchor('messages/create', 'Add new Message');
				}
				?>
Finally, we need to replace the login and registration links at the top of the page with a logout link. Head back over to the template file and make these few changes:
				if (isset($user_info))
				{
					echo $user_info;
				}
				else
				{
					if (Auth::instance()->check())
					{
						$link = array('Logged in as: '.Auth::instance()->get_screen_name(), Html::anchor('users/logout', 'Logout'));
					}
					else
					{
						$link = array(Html::anchor('users/login', 'Login'), Html::anchor('users/register', 'Register'));
					}
					echo Html::ul($link);
				}
Now instead of always showing links for logging in or registering, once a user is logged in their name will be displayed along with a link to log out!
Finished!
Congratulations! You now have a working understanding of Fuel along with this neat little messaging system!
For questions, comments, or suggestions, let us know on Twitter @Techrangers!