Installing Materia into Instructure’s Canvas LMS
While Materia works perfectly well as a standalone application, integrating it with an LMS unleashes its full potential. This includes:
- Fast and automatic authentication with LTI
- Automatic grade passback when widgets are used as assignments
Materia currently supports Instructure’s Canvas, but there’s nothing stopping intrepid developers from building out support for additional Learning Management Systems.
LTI 1.1 vs LTI 1.3
Materia has transitioned to LTI 1.3 in the v11 update. Even if you were already running Materia v10 or below, you will need to configure Materia’s LTI 1.3 integration as a new tool in your Canvas instance. Canvas will automatically migrate existing resource links from the 1.1 tool instance to the 1.3 tool instance provided they are located on the same domain. Once the LTI 1.3 integration is installed and validated, the prior 1.1 integration should be retired and removed from your LMS.
Configuration
Refer to the Server Configuration Variables page for a detailed breakdown of the LTI server configuration options. As with other server variables, these configurations should ideally be defined as env variables in a .env file.
Initial LTI 1.3 Setup
Setup keys via shell access from your python container:
$ python manage.py rotate_keys
Create a new LTI Registration
As a superuser, visit the django admin panel (https://your-materia-instance.edu/admin/ or select “Django Admin” from the “Admin” top-level menu when logged in to Materia). Select “LTI Registrations”:
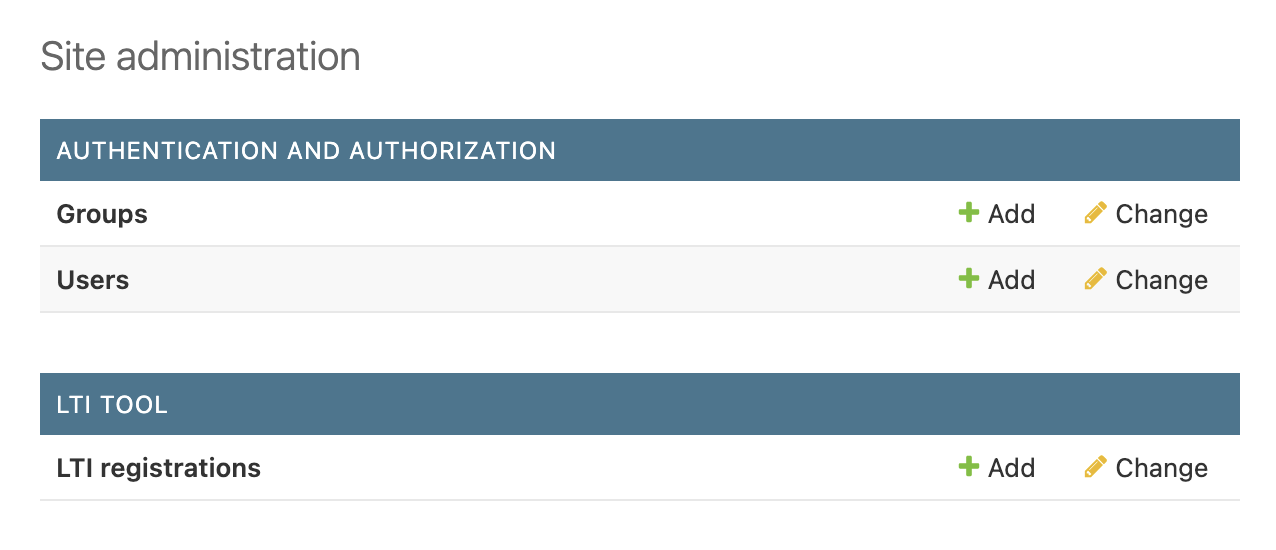
Then select “Add LTI Registration +” on the top-right. Let’s review the options to provide in this menu:
| Field | Description |
|---|---|
Name |
The name of the registration. This should be a url-safe string, such as webcourses or my-institutional-lms. |
UUID |
The unique ID of this registration. This field is auto-populated with a random value, which you can keep. |
Issuer |
For Canvas, this is https://canvas.instructure.com. |
Client ID |
This must match the client ID of the LTI developer key in Canvas. Since this is not yet populated, give it a default value such as 000000001. |
Audience |
It’s safe to leave this blank. |
Auth URL |
The Canvas authentication endpoint. For instances that Canvas hosts, this is https://sso.canvaslms.com/api/lti/authorize_redirect. |
Access token URL |
The Canvas endpoint for oauth2 authentication tokens. For instances that Canvas hosts, this is https://sso.canvaslms.com/login/oauth2/token. |
Keyset URL |
The URL for Canvas’s public JWKS. For instances that Canvas hosts, this is https://sso.canvaslms.com/api/lti/security/jwks. |
Is active |
Ensure this checkbox is enabled. |
Once these fields are populated appropriately, select “Save” at the bottom. The public LTI configuration JSON will now be available at https://your-materia-institution.edu/lticonfig/lti-configuration-name, where lti-configuration-name is the string you provided in the Name field above. Don’t close this tab yet; you’ll need it again in a minute.
Create a new LTI Developer Key
In Canvas, it’s time to create the new developer key. In the Canvas Admin page, select Developer Keys followed by ”+ Developer Key” and ”+ LTI Key”. Under the “Method” drop-down, select “Paste JSON”. In the empty text area, paste the JSON contents of the /lticonfig page mentioned above. The JSON provided by Materia auto-populates all the requisite fields for a new LTI key, but be sure to update the Key Name, Owner Emails, and Notes as appropriate.
When you’re done, select “Save” and enable the key by toggling the switch.
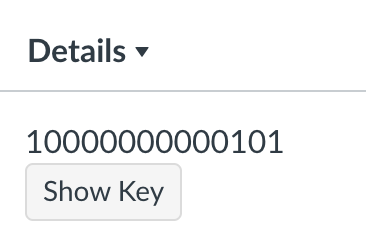
Lastly, copy the Client ID, which is the long integer value under the “Details” column:
Create a Deployment
With LTI 1.3, configuration is split between registrations and deployments. After creating a new registration, you still need to register a deployment. This can be in an individual course, or on the account-level.
Install a deployment in a course
In a course you own, select “Settings” from course navigation followed by “Apps” at the top. Select ”+ App” and under “Configuration Type” select By Client ID. Paste the client ID we saved earlier, which should correctly reference the Materia 1.3 instance.
Install a deployment on the account level
In the Canvas admin panel, select “Settings” at the bottom of the left-hand navigation menu followed by “Apps” at the top. Select ”+ App” and under “Configuration Type” select By Client ID. Paste the client ID we saved earlier, which should correctly reference the Materia 1.3 instance.
In either case, once the app is installed, select the cog on the right of the newly installed app followed by “Deployment ID”.
Update the Client ID and Deployment ID in Materia
Now we have to go back to the LTI Registration configuration in the Materia Django admin panel. Select the LTI Registration you created earlier, and paste the real client ID in the Client ID field. Then, under “Deployments”, paste the Deployment ID in the first row and then select the “Is Active” checkbox. Don’t worry about the Platform Instance drop-down: this will auto-populate later.
At this point, you should be good to go! Materia will be available in the context of your deployment, whether that’s a course or account. It will not be present in Course Navigation by default but can be enabled at any time by editing your Course Navigation and dragging Materia to the enabled section. Regardless of Materia’s visibility in course navigation, “Materia Widget” will be present in the External Tool selection when creating a new assignment or module item.